AWS Client VPN provides a fully managed, scalable VPN service that enables your remote team to securely connect to AWS resources. The solution is designed to be highly elastic, automatically scaling up or down in response to user demand, providing a reliable and efficient remote access experience.
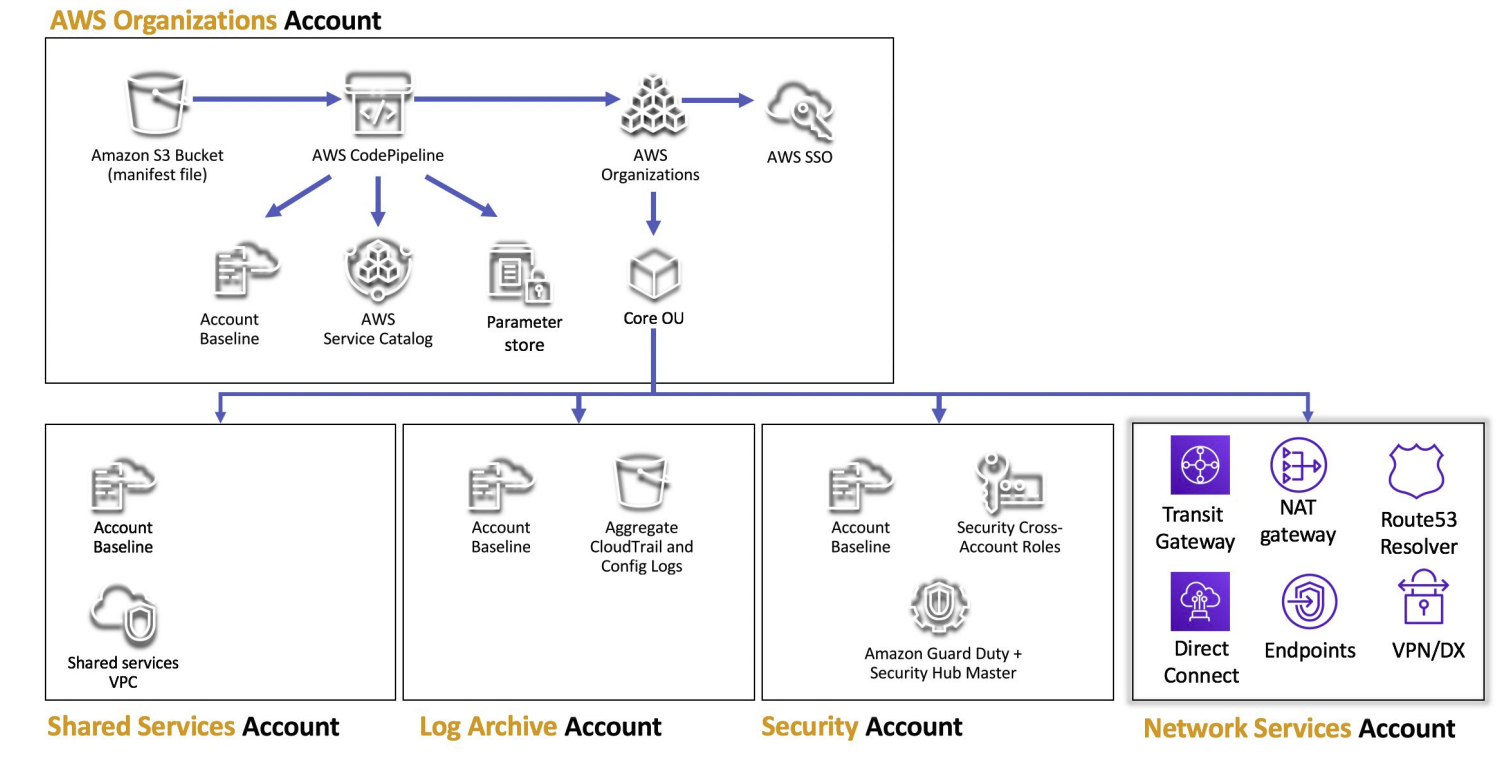
By the end of this blog post, you will be able to establish secure communication channels between multiple VPCs using AWS Client VPN integrated with AWS SSO. AWS has provided a whitepaper that covers the high-level details of creating an AWS Client VPN architecture titled "Building a Scalable and Secure Multi-VPC" and outlines best practices. According to the AWS Whitepaper, Building a Scalable and Secure Multi-VPC AWS Network Infrastructure, network-related services should be located in a separate networking account.
https://d1.awsstatic.com/whitepapers/building-a-scalable-and-secure-multi-vpc-aws-network-infrastructure.pdf
Following the practices outlined in the whitepaper, this blog post will show you how to set up AWS Client VPN and integrate it with AWS SSO to access your resources running in a private subnet.
Overview of the Process:- Creating VPN Groups in the IAM Identity Center:
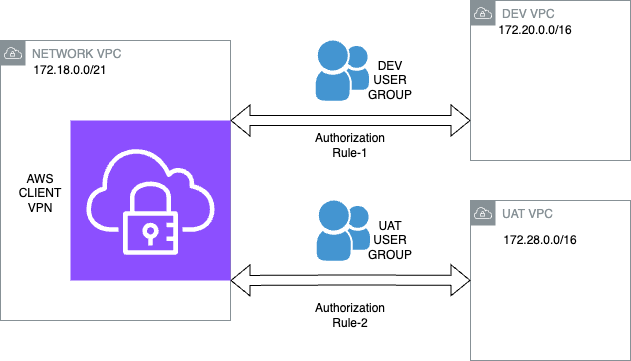
We will begin by creating VPN groups in the IAM Identity Center. Depending on your needs, you may want to create multiple VPN groups, such as DEV and UAT, and configure destination VPC access based on these groups in the Client VPN configuration. - Creating a Client VPN in the Network Account:
After configuring VPN groups, we will create a Client VPN in our Network account. This involves configuring the route table and authorisation rules for the Client VPN. - Setting Up a Transit Gateway:
Once the Client VPN is ready, we will create a transit gateway in the Network account and share it with target VPCs. This setup allows for a connection between the Network VPC and the transit gateway attached to the VPCs. - Creating Routes Between Subnets:
Finally, we will establish routes between subnets in the Network account and other accounts.
AWS Transit Gateway offers a central hub to connect your Amazon VPCs and on-premises networks, simplifying your network architecture and removing the complexities of peering. Acting as a scalable cloud router, Transit Gateway ensures that each new connection is established just once.
After this brief, let's take a deeper look at the architecture. The critical points of this architecture are properly configuring authorisation rules, route table routes for Client VPN, and route tables of subnets.
Before a demo, let’s discuss three essential parts of creating a Client VPN. Diagrams will help us understand what we will do in the demo part.
Detailed Steps
- Configuring Subnets
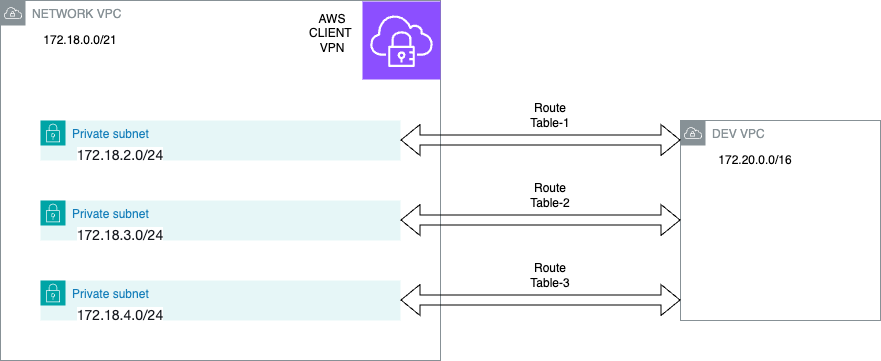
We need to create a route in the route table between each subnet attached to AWS Client VPN and the destination VPC, using Transit Gateway as the target and vice versa. - Configuring Authorisation Rules for Client VPN
Authorisation rules exist for specifying which user group can access which destination network. For example, we should create a dev group and add an authorisation rule to only allow access from the dev group to a specific destination network. Another option is to enable all users to go to a particular destination. - Configuring Route Tables for Client VPN
Route tables exist to specify connections between AWS Client VPN and destination networks. We need to create a route between subnets attached to AWS Client VPN and destination VPCs. The difference between the “Configuring Subnet” part is that we’re creating routes for the Client VPN here.

To summarise, we demonstrated how to configure an AWS Client VPN and a Transit Gateway in the Network account and transit gateway attachment with diagrams.
DEMO- Creating a VPN Group in SSO
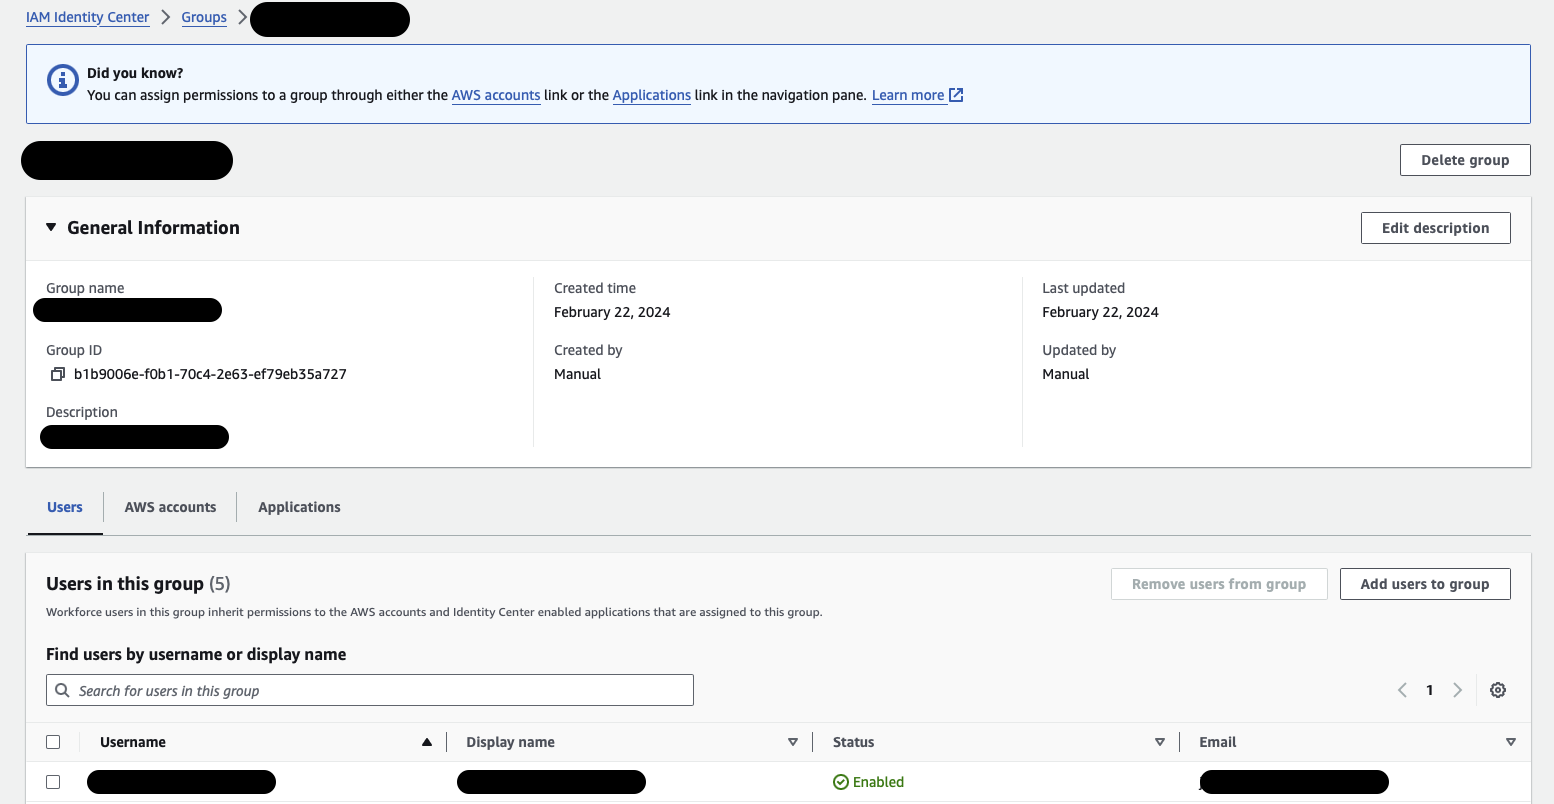
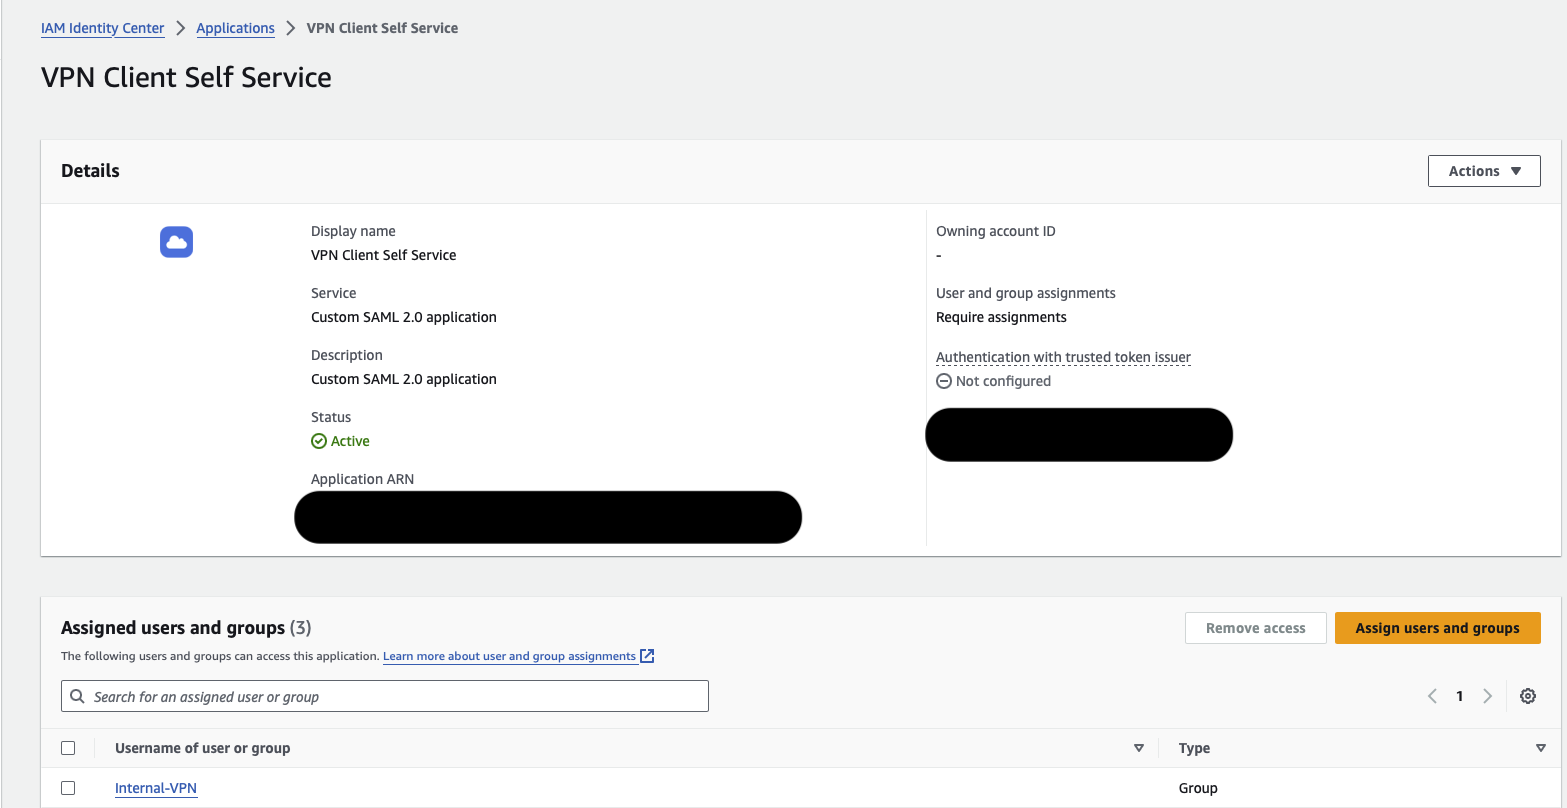
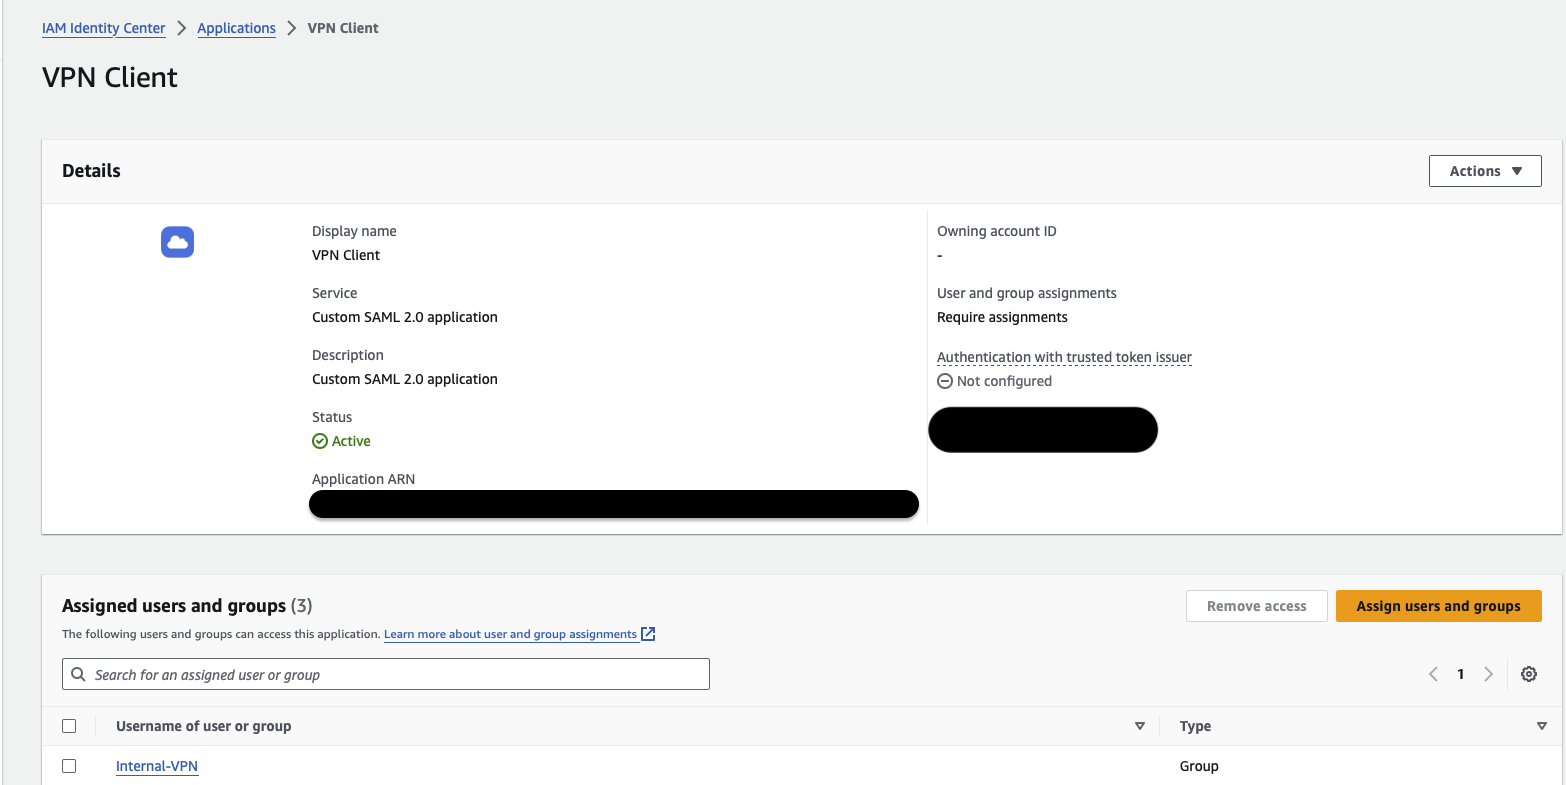
We need to create groups according to our needs for use in Authorisation Rules. Thus, we will separate people's permissions by grouping them. We created this group from the IAM Identity Center. The group ID will be used to configure authorisation rules. - Creating SAML Application
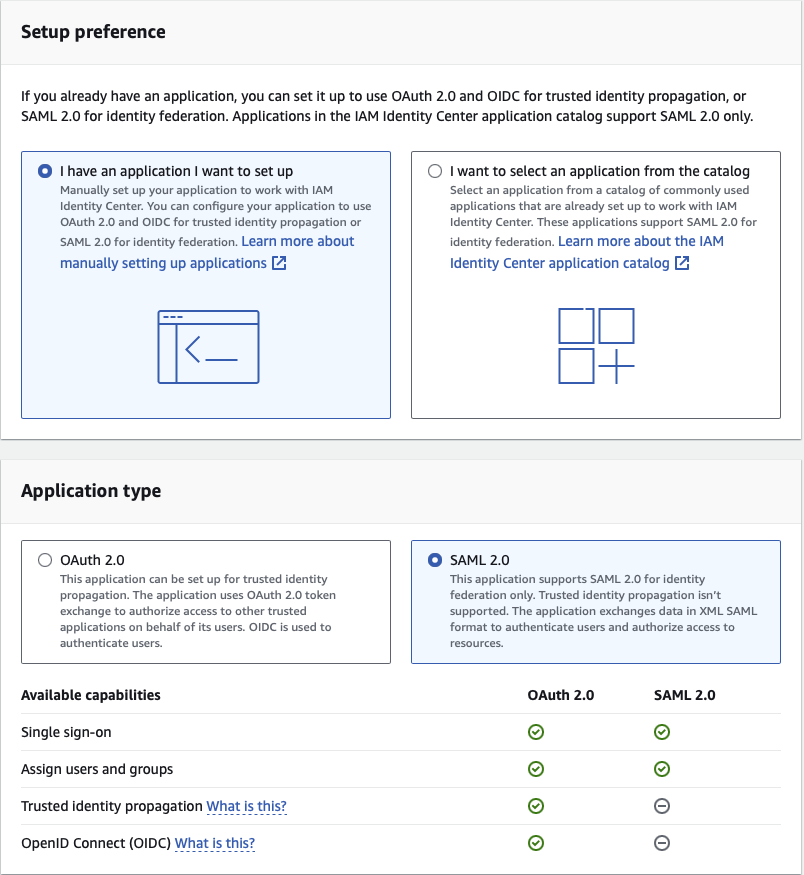
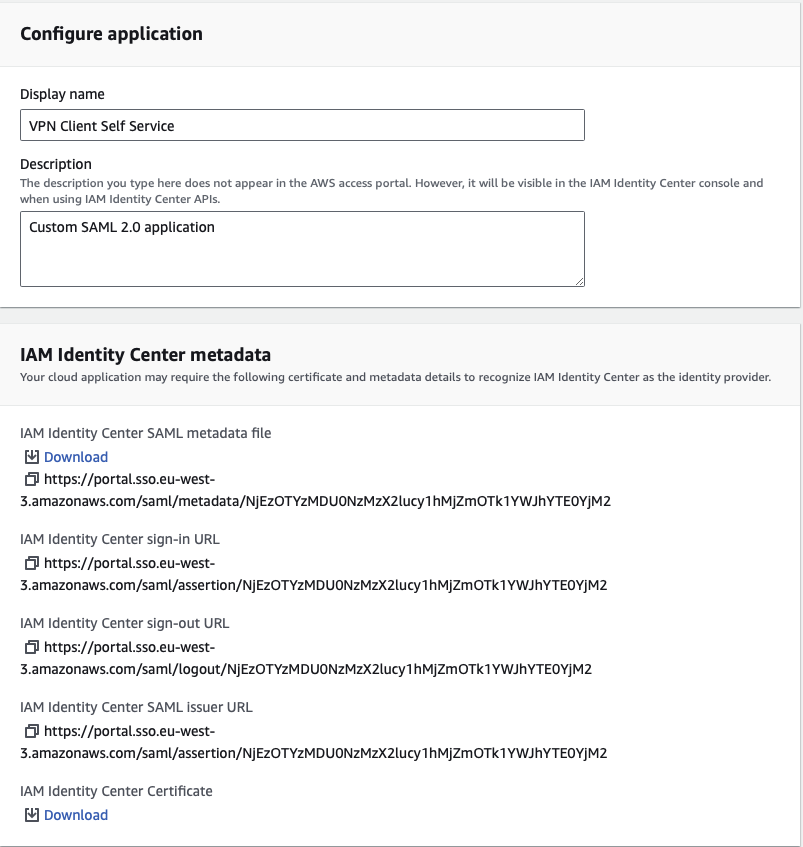
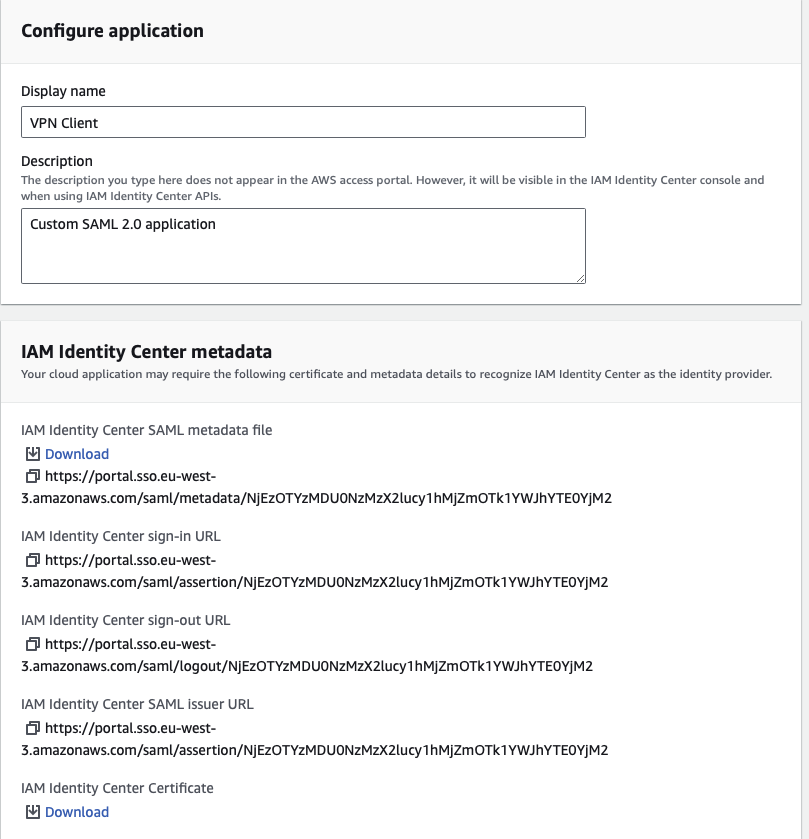
Creating a SAML application for a SAML provider enables centralised and secure user authentication, allowing users to access multiple applications with single credentials through Single Sign-On (SSO). This enhances the security, user experience and simplifies user management by leveraging the robust authentication mechanisms provided by the Identity Provider (IdP). We’ll create SAML applications in the IAM Identity Center. Under the “Applications” section, you need to add a “Customer Managed” application. Two types of SAML applications are needed: one for the Client VPN and another for the Client VPN Self-Service Portal. The SAML provider for the Client VPN is used to authenticate and authorise VPN connections, while the SAML provider for the Self-Service Portal allows users to manage their own VPN connections and settings.
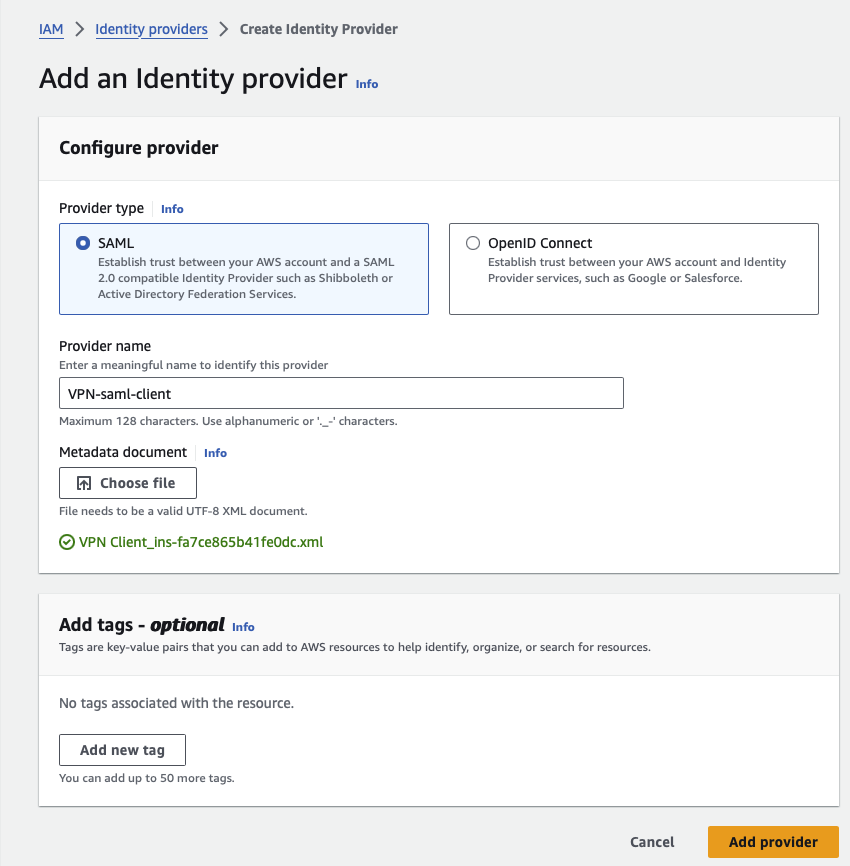
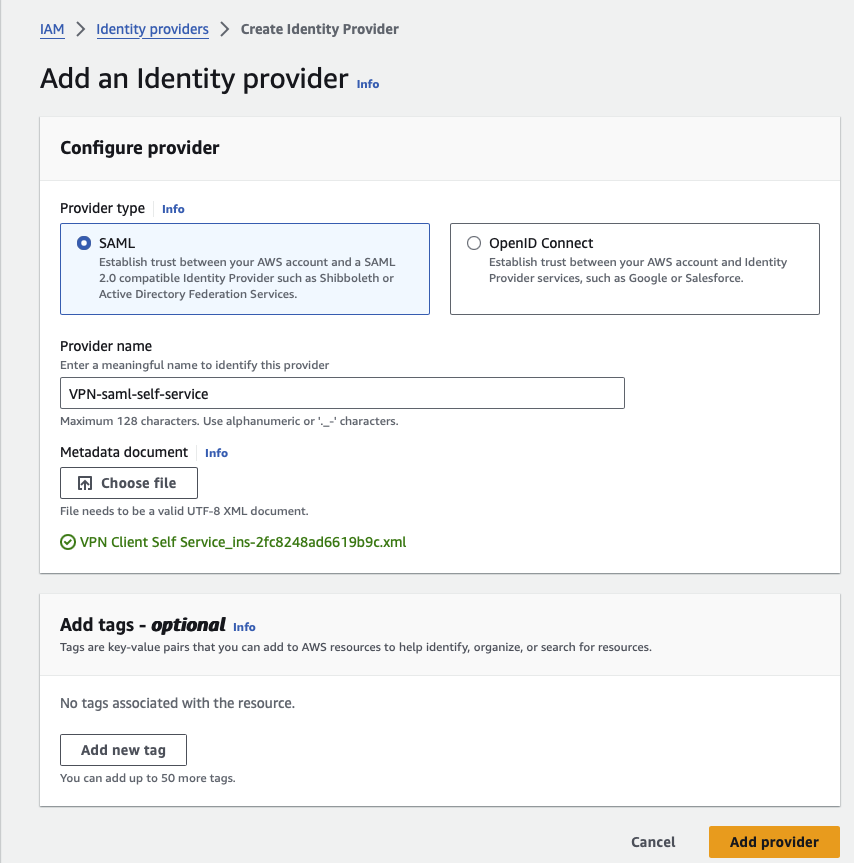
You need to download the metadata files for each application. The next section will use these files to create SAML providers. As the last step in creating SAML applications, we’ll add the VPN group we created in the previous section to both SAML applications. - Creating SAML Providers for AWS Client VPN
Creating SAML (Security Assertion Markup Language) providers for Amazon Client VPN is a crucial step in enabling federated authentication and single sign-on (SSO) capabilities. Two types of SAML providers are needed: one for the Client VPN and another for the Client VPN Self-Service Portal. The SAML provider for the Client VPN is used to authenticate and authorise VPN connections, while the SAML provider for the Self-Service Portal allows users to manage their own VPN connections and settings. You need the AWS Single Sign-On (AWS SSO) metadata document to set up these providers. You can download this document by navigating to the AWS SSO console, going to the "Applications" section, and selecting the relevant application. By setting up these SAML providers, you enhance security through centralised authentication and simplify user access management across your organisation. - Configuring AWS Client VPN with AWS SSO
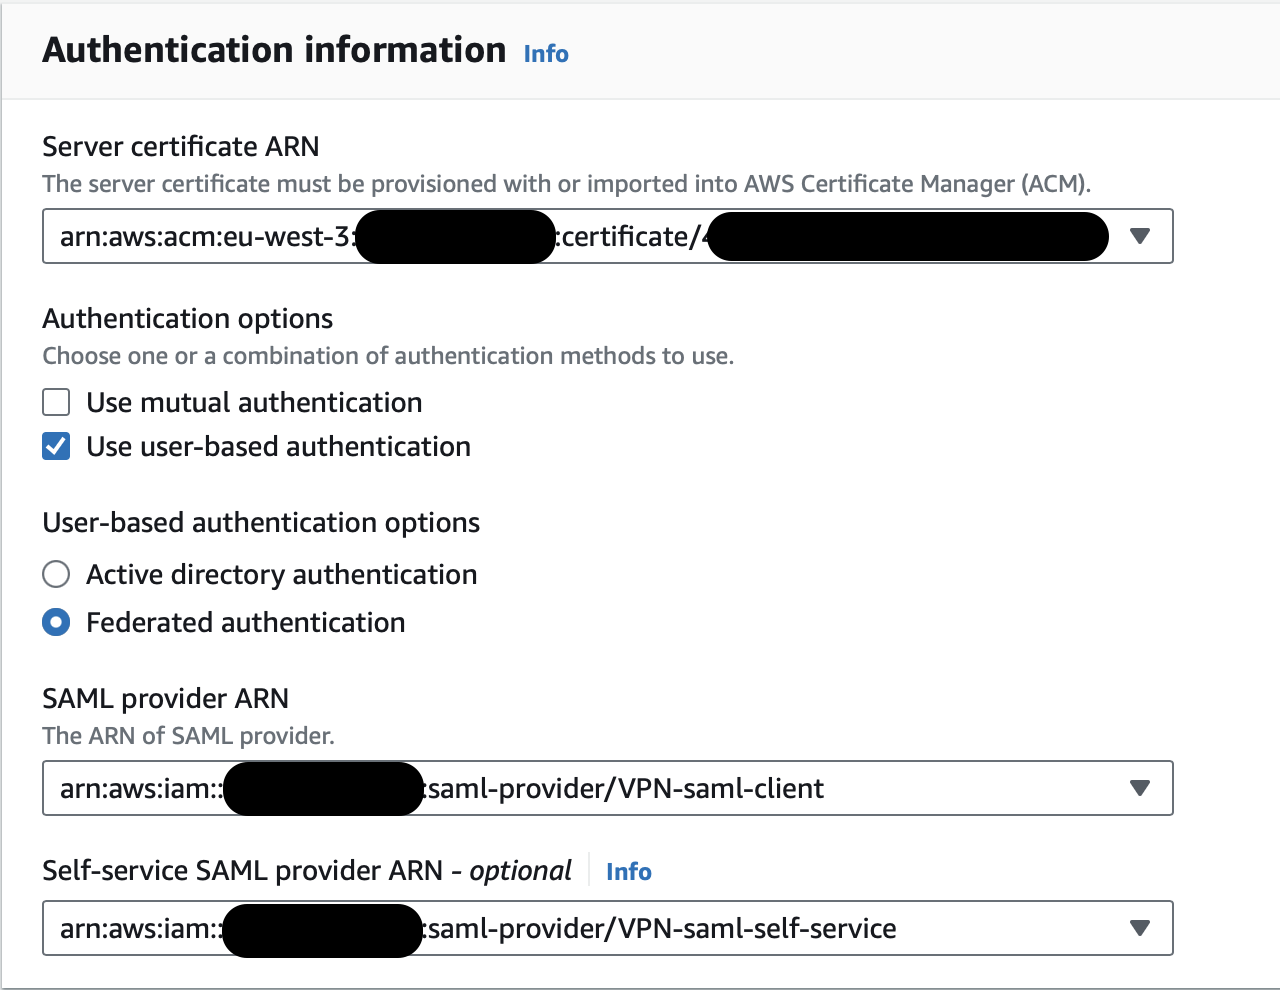
Authentication information is the key to filling in the blanks on the Client VPN Endpoints page in the VPC section. This section will specify our authentication option for integrating AWS SSO and Client VPN. We will choose Federated authentication for user-based authentication and provide SAML provider ARN and Self-service SAML provider ARN.
After creating the Client VPN Endpoint, it’s time to configure it. - Target Network Associations
We’ll add the private subnets in the VPC used by our Client VPN. - Authorisation Rules
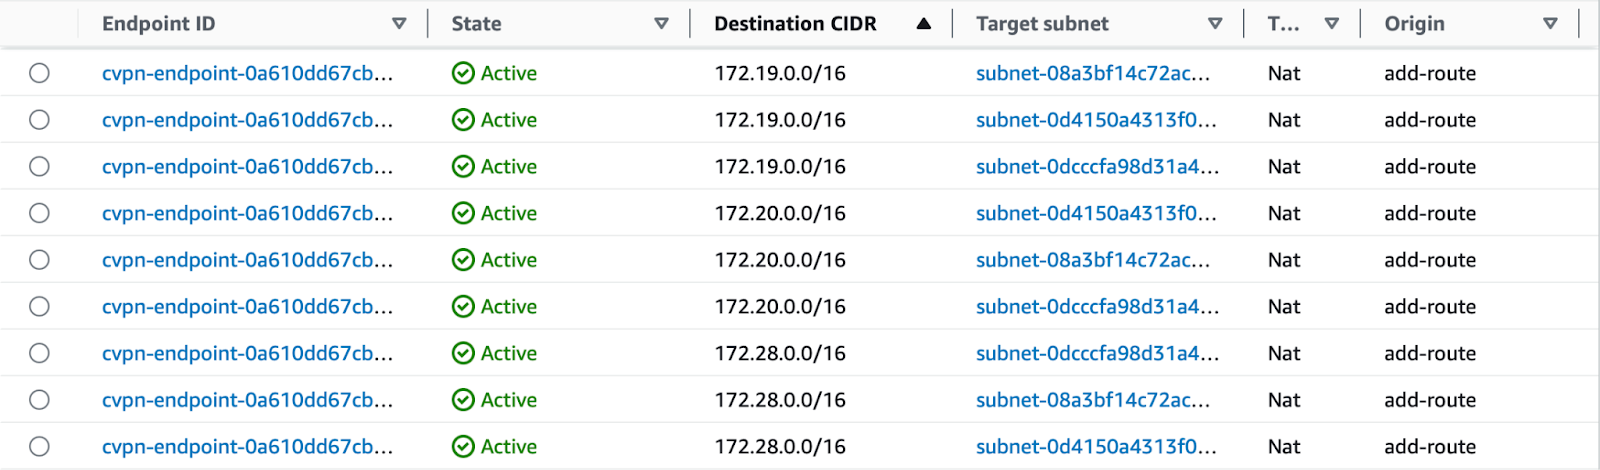
As mentioned above, we used Authorisation Rules to specify which user group can access a specific network destination. As shown below, different Group IDs were attached to different Destination VPCs. - Route Table
We have three private subnets attached to the VPC used by our Client VPN. As mentioned above, we will add a route between each private subnet and the destination VPCs.
Now, the Client VPN is ready. As the last step, we’ll configure routes for each subnet we added in the “Target Network Associations” section and subnets we want to connect from the destination VPC. Thus, we will be able to create a connection between these two private subnets in different accounts. - Configuring Route Tables Of Private Subnets
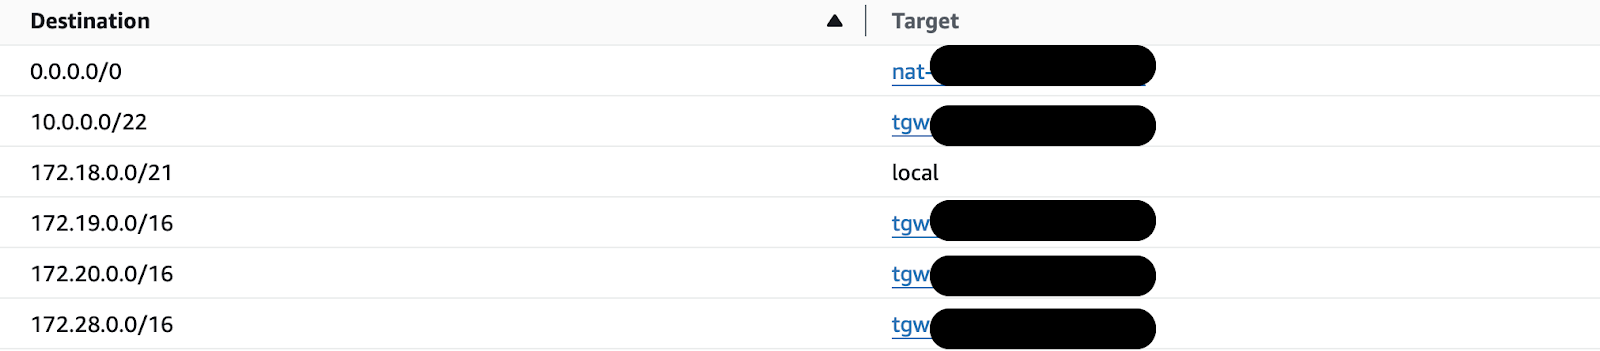
We added the routes for the subnet in the Network Account and the three private subnets attached to the Client VPN.
We added the route for the subnet in the Dev Account. If we want to connect more subnets from the destination VPC, we must do the same for other subnets.


TEST
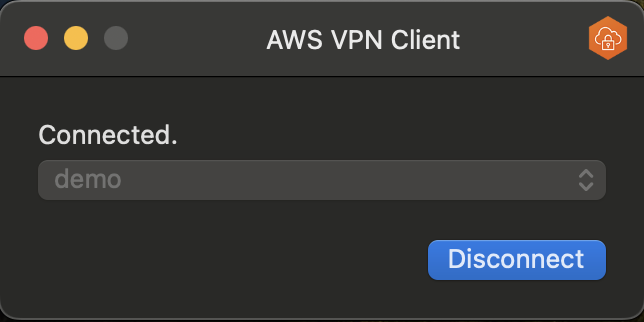
In this test, we used the AWS Client VPN application to connect the VPN. You need a configuration file that you can download from the AWS Client VPN page in the VPC section. This file ends with ovpn. Once you have this file, you can create a profile and connect it to your AWS Client VPN.
https://aws.amazon.com/vpn/client-vpn-download/
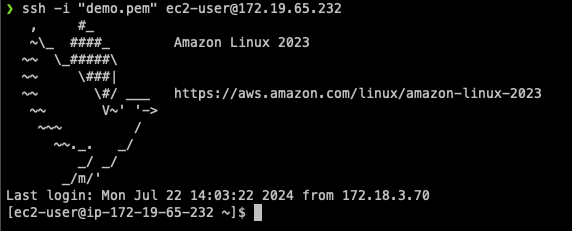
In this test, we’re trying to connect to VPC in 172.19.0.0/16 CIDR block.
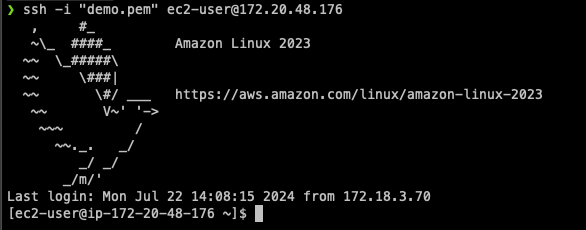
In this test, we’re trying to connect to VPC in 172.20.0.0/16 CIDR block.
CONCLUSION
The Client VPN configuration with route tables, authorisation rules, and SSO integration is in place, and the connection between your private network and AWS VPC is ready. We hope this blog post helps you set up secure access to private resources in your AWS environment using AWS Client VPN and AWS SSO.