Kubernetes is not secure out of the box, and we can apply additional configurations to achieve a secure cluster. One of our actions is limiting the communication between the pods in a Kubernetes cluster.
Here, network policies can help us secure our clusters to ensure only allowed communication can happen without compromising our cluster.

What is a network policy?
A network policy is a Kubernetes resource that controls the traffic flow between pods. You can consider a network policy like a firewall in a data-centre infrastructure. You can specify the rules to allow or deny the communication between pods, namespaces, and IP ranges both as ingress and egress.
Why do we need network policies?
To secure your Kubernetes clusters, one of the actions we can take is restricting the traffic flow between our pods or namespaces in our clusters which is, by default all traffic is allowed.
In real-life scenarios, we wouldn't want that. Imagine you have a payment application in a namespace that all the transactions are going through and any other pods in different namespaces. Regardless of whether they need to communicate with it, they will be able to access. In such a case, we can use network policies to isolate your sensitive application/data from the rest of your cluster, either pod, namespace or IP range level.
Another scenario can be, especially if you are on the cloud, an attacker can access your pod and then start querying the instance metadata and get some temporary credentials. Also, let's say the instance has a powerful role attached to it, then the attacker can access your resources or sensitive data. Again by using network policies, we can block access to the metadata.

Can we use network policies directly?
We need to have a Container Network Interface (CNI) plugin that supports it to use network policies. Otherwise, after we apply our policy, the policy resource will be created in the cluster but won't be effective. For example, we'll use kind for our demo, and the default CNI comes with it (kindnetd) won't work, so we will use Calico, one of the most popular plugins for our network policies to run.
Also, you can find other supported popular CNI plugins below:
- Weave
- Cilium
- Romana
For more details, you can visit Kubernetes official page here.
How do network policies work?
Network policies use labels and selectors in Kubernetes cluster, and so you need to use labels to apply a Kubernetes network policy to a pod that will affect. You can also again use labels to specify which pods and/or namespaces toward those using rules.
What policies can we use with network policies?
As we mentioned before, we can apply network policies to pods and create ingress or egress rules from/to another pod, namespaces and IP ranges. Using these options, we can create:
1. Deny traffic for ingress, egress or both. By applying these, you can start isolating pods in your network so it can be a good starting point.
2. We can create additional complex policies on top of that.
When we apply different network policies to a pod, all the policies are merged, and the evaluation order doesn't affect the policies result.
So I think this is enough to understand what network policies are and why we should use them. Now it's time to talk about our sample use case and demo.
Example network policy in a real-life scenario
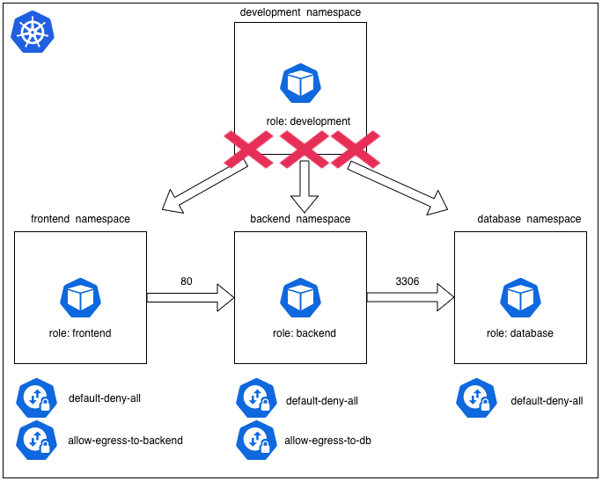
Basically, what we are going to do is, we are going to deploy four pods in different namespaces, as seen below.

Sample scenario
The requirements for the scenario is:
- Any pod with a label role:frontend in the namespace frontend can access to backend pods on port 80.
- Any pods with label role:backend in the namespace backend can access to database pod on port 3306.
- No other pods in the cluster can communicate with these pods, and these pod can't access anywhere externally.
What other policies do you think will help secure our cluster?
Our next blog post will show you how to achieve these using network policies, so stay tuned.
Also, we offer a Kubernetes Security Audit; if you'd like to hear more about it, please take a look at it here.
