One of our main motivations at Bion is to automate everything eventually. With this motivation in mind, I was recently automating one of my projects using Ansible. I wanted to combine GCP Identity Aware Proxy (which from now on I'll refer to as IAP) with Ansible, but I discovered a lack of available information about configuring IAP settings for Ansible.
There's a great feature in GCP that you can use to connect instances and/or apps in the private network without installing a VPN solution. In this blog post, I'll go through every step of the configuration with detailed explanations. Before going deeper with IAP, I'll also explain a common security practice in identity, which is called zero trust.
What is Zero Trust Identity Security?
A zero-trust network is one in which no person, device, or network enjoys inherent trust. All trust, which allows access to information, must be earned. The first toward earning that trust demonstrating valid identity. A system needs to know who you are, confidently, before it can determine what you should have access to. Add to that the understanding of what you can access–authorization–and you've got the core foundation of zero-trust security.
I know, the quote from the documentation won’t help you understand the main idea, but Google Cloud has already explained the Zero Trust Identity Security pretty well with a real-world example using the comic below.
 Google Cloud Comics Zero Trust: Identity.[1]
What is IAP?
Identity-Aware Proxy (IAP) is a Google Cloud Platform service that centralizes user access to SaaS applications and other cloud resources accessed by HTTPS. IAP secures authentication for requests made to virtual machines running on GCP and other cloud-based and on-premises applications, only granting access to users you authorize. With IAP, users can connect from untrusted networks without using a VPN.

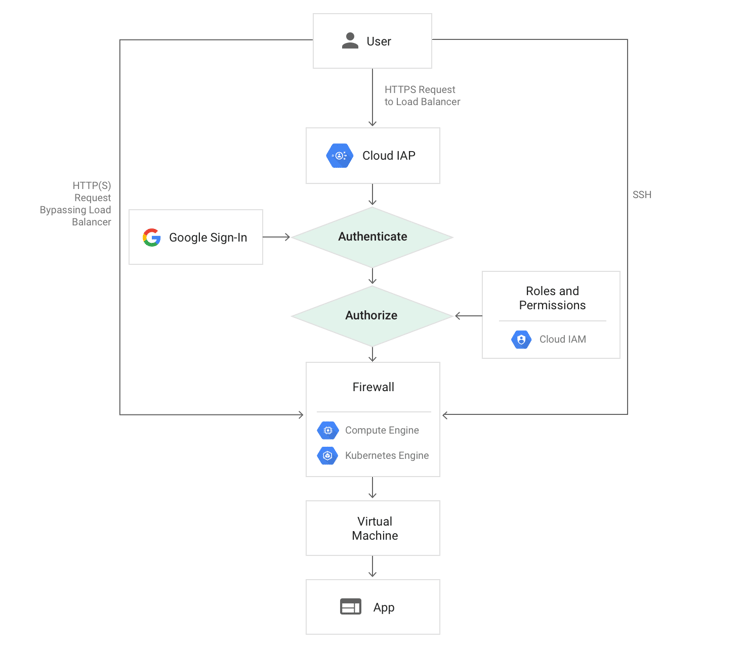
After receiving all the incoming traffic, the IAP identifies which user is sending the request by adding a header when sending it to the internal resources.
Other instances in the same data center may be compromised and fake requests with changed headers (username/mail) may come to the webserver. Thanks to the JWT header, we can avoid this. JWT can't be spoofed because It's digitally signed by Google.
 Example diagram of IAP workflow on Compute Engine [2]
Google’s Identity-Aware Proxy aims to increase security, allowing admins to establish and enforce access-control policies. The service simplifies access for cloud administrators and remote workers, eliminating the need for a VPN.
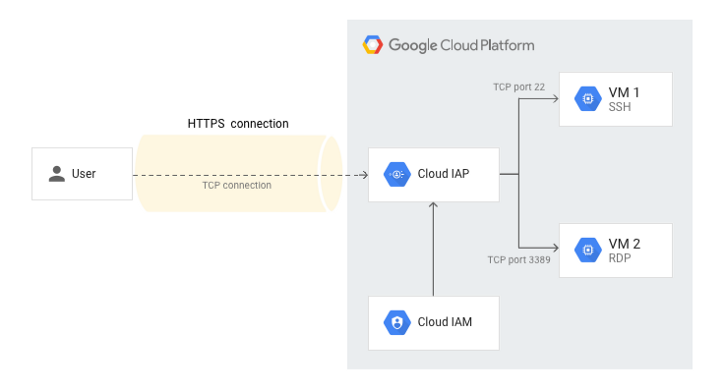
IAP provides a zero-trust access model for GCP resources such as Google Compute Engine and Google Kubernetes Engine (GKE) instances, allowing access only to users with the correct identity and access management (IAM) role. Additionally, you can use TCP forwarding to control access to SSH and RDP. With proper configuration, IAP will also authenticate to apps on other clouds and on-premises.
Example IAP Architecture in Google Cloud Platform
Use cases
- Authentication for web applications and cloud resources.
- Access control for SSH and RDP.
Pluses
- SSH access is available.
- RDP access is available.
- Automatically creates an OAuth 2.0 client ID and secret.
- Easy to integrate with other GCP services.
Minuses
- Limited third-party integration.
- The initial setup is complex.
Ansible Configuration
Now that we’ve already learned about zero-trust policy and IAP, we can continue with the required configuration for the Ansible side.
The required configuration should include 3 files in total.
The order of the files doesn’t matter.
- ansible.cfg contains the required configuration for using misc/inventory.gcp.yml and enables the gcp_compute plugin.
- misc/inventory.gcp.yml contains plugin settings for dynamic configuration.
- group_vars/all.yml contains the ssh argument configuration.
Let’s deep dive into the files.
ansible.cfg
Contents:
|
[inventory] |
First things first - we are telling Ansible that we want to use the gcp_compute plugin for our inventory. Then we are pointing Ansible to our inventory configuration file from which the contents can be found at misc/inventory.gcp.yml.
A second important thing to add is the private_key_file. Basically, we are telling ansible we will be using the default google_compute_engine private key while connecting to our instances.
Your SSH key could be different than the default google_compute_engine. If you would like to get the key without any further configuration, you can run the below gcloud command.
|
gcloud auth login |
The above command will redirect you to log in. Once you logged in, your key will be available at ~/.ssh/google_compute_engine
misc/inventory.gcp.yml
Contents:
|
plugin: gcp_compute |
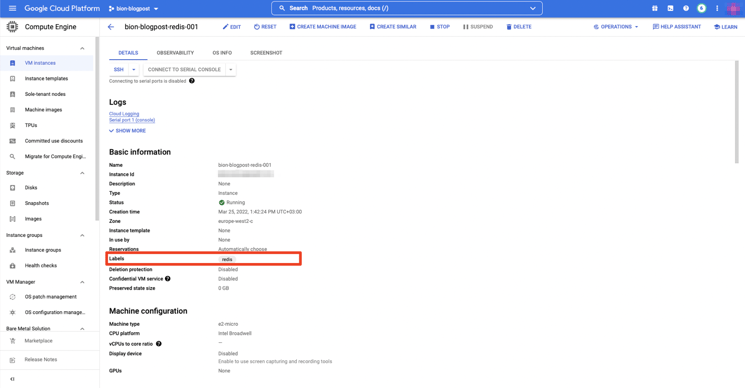
The above code will enable the automatic inventory of all the “to compute” instances running in the [YOUR_PROJECT_HERE]. Groups will be generated based on the given keyed_groups configuration. In the above configuration, I’m just looking for a “redis” in labels of the instance.

Instance Configuration Details
Setting the ansible_host to the name will make sure our ssh command will work. Without ansible_host Ansible will pass the instance IP address which does not fit for the gcloud ssh command.
/group_vars/all.yml
Contents:
|
ansible_ssh_common_args: "-o ProxyCommand='gcloud compute start-iap-tunnel %h %p --listen-on-stdin --zone --project '" |
As a final configuration file, this one will be passed to our ssh command as an argument. Basically, gcloud ssh uses the same argument while connecting an instance (you will get a similar output with increasing the verbose level of gcloud ssh) through the gcloud command. and will be passed by Ansible.
Test Flight!
Since we are done with the Ansible configuration part, that means we are ready to try out our inventory file with the below command.
|
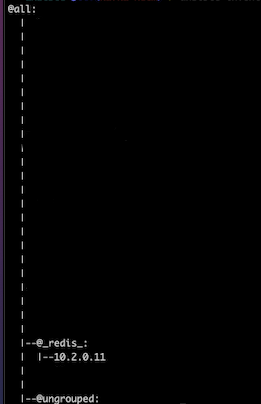
ansible-inventory -i misc/inventory.gcp.yml --graph |
The output will be similar to below, based on your keyed_groups and labels.

Let’s ping our redis group with an Ansible ping module!
|
ansible [YOUR_GROUP] -i misc/inventory.gcp.yml -m ping |

It worked like a charm!
We successfully configured Ansible to use GCP IAP tunnelling along with the dynamic inventory.
I hope you found this post helpful, and if you enjoyed reading it, please don’t forget to share.
